

Wednesday, July 29, 2009
Monday, July 27, 2009
Another sigh-worthy party...
The princess party...
The party girl's dress was made of layers of pale aqua blue organza with a pink millinery rose. Pure shabby chic perfection...


All of the guests wore hand-made princess wreaths in their hair...


the girls all decorated their own princess wands...


Next they decorated their own cupcakes...


...and took them home with them all packaged up...

The goodie bags...


... what princess goodie bag is complete without some bling!

Rebecca ox
Friday, July 24, 2009
Friday Fancies: shared spaces with a hint of green
Tonight, shared spaces that are not totally kid havens, but rather, shared areas with the rest of the house. All tied in beautifully with cooling and relaxing greens. Enjoy.


and then somewhere to display it all

a whole wall to decorate with perfect green tubs

clever wall storage and display

a beautiful shade of green for a feature wall

ellie the elephant wall decal

a clean and simple chest or draws


hint of green in the curtains and a great book shelf

somwhere dedicated to be creative

somwhere dedicated to be creative

and then somewhere to display it all

a whole wall to decorate with perfect green tubs

clever wall storage and display

a beautiful shade of green for a feature wall

ellie the elephant wall decal
Rebecca ox
Thursday, July 23, 2009
Little Ladybird Party


What a beautiful idea for a little one's birthday party. Ladybirds are cute at the best of time, but wen applied to all things party, they make for a beautiful theme.
With the ladybird cake and the flower choc mousse pots (which I might steal for Ned's party) they food looks great, coupled with gorgeous bug nets to catch little ladybird chocolates- what fun for all.
All topped off with ladybird pencil cases for the party favours. What a treat.
Rebecca ox
Monday, July 20, 2009
Potato-stamping!
Bit of a spin on the traditional potato-stamping, where I used fabric paint and teatowels for this eapsy peasy project, and boy was it fun!
 \
\


...the potatoes at the end of it all...

... and then the hand painting...

... and the the finished products!

 \
\


...the potatoes at the end of it all...

... and then the hand painting...

... and the the finished products!

I shaped the potatoes into star, flower and heart shapes, and used three different colours of fabric paint (just bought from Spotlight).
Covered the table in paper and stood back. I was plesantly suprised by how non-messy it was, but old clothes were the order of the sfternoon with it being fabric paint lol.
So I have scored some beautifully hand-decorated teatowels which Ned is very proud of. So proud, in fact, he said that Brodie could take them to football and "hang them on the fence". Don't know where that came from, but I thought it was a lovely gesture!
Needless to say the afternoon ended up wiht finger painting, shich quickly turned into hand painting, which rapidly decended into "ok kids its time to pack up" lol
POTATO STAMPING INSTRUCTIONS:
1. Clean the potatoes first. Wash and towel dry.
2. Cut the potato in half and carve out the shape at the bottom (I used cookie cutters as a guide, pushing them into the flesh and then cutting away the excess potato around the edge).
3. Prepare different colors of fabric paint on shallow containers (I used small plastic plates).
4. Dip a potato stamp on paint, making sure that the bottom is evenly-coated with paint.
5. Press the stamp firmly onto the paper or fabric.
VOILA!
Rebecca ox
Thursday, July 16, 2009
I knew I ate copious amount of jam for a reason...
How gorgeous AND practical are these...

...recycled craft jars!
The perfect use for all of the empty jam jars I have been collecting and just waiting to use! And with the kids getting more and more into the craft activities I really want to start collecting bits and pieces to use.
They seem easy enough to make - I think if you just paint the lids with a regular wall paint (just getting a small sample pot would be ample), then use masking tape to create the rectangle for the label, and then paint 2-3 coats of chalkboard paint, that would work a treat!
They seem easy enough to make - I think if you just paint the lids with a regular wall paint (just getting a small sample pot would be ample), then use masking tape to create the rectangle for the label, and then paint 2-3 coats of chalkboard paint, that would work a treat!
I am sure the kids will love helping to decorate the labels, and learning all about the things we are putting in the jars, not to mention using all the goodies for their next craft session!
Tuesday, July 14, 2009
What a hit these were! All four of us finished off ur serves- served them with mash potato and green salad. Yummo.
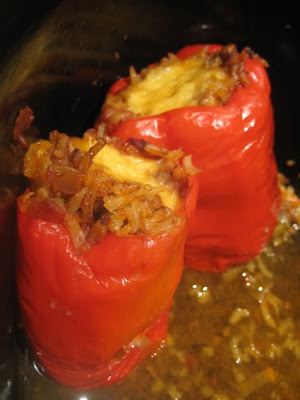
STUFFED PEPPERS
For 4-6 servings
INGREDIENTS:
1 Tbs oil
6 red or green peppers/capsicums
diced brown onions
2 crushed garlic cloves
500 g beef mincee
½ cup long grain rice
1 tsp dried thyme
1 teaspoon cummin
pepper and salt to taste
400g can crushed tomatoes
½ cup greated cheese
½ cup stock
Turn slow cokker on to high to preheat, and coat with non-stick spray.
Heat in a pan the oil and add the garlic and onion. Cook, stirring frequently, for 2-3 minutes or until the onion is soft.
Break the mince into small pieces and add to the pan. Continue to cook, stirring frequently until the mince is lightly browned.
Add the rice, herbs, salt and pepper and stir to combine. Stir in the tomatoes. Allow the mixture to return to the boil, then remove from heat.
Prepare the peppers by removing a thin slice from the bottom (don't cut too far up or the filling will fall through the bottom), so the peppers will stand unsupported. Cut around the stem at the top, making an opening 4-5 cm across, pull out the core and seeds, and remove as much of the whiteish part as possible.
Spoon the filling mixture into the peppers and top each with a little grated cheese. Arrange them around the edge of the bowl so one side of each pepper is against the side of the bowl. Carefully pour the stock into the middle of the bowl.
Put on the lid and cook on high for around 4 hours.
And for tonight- beef curry a-la slowcooker style- stay tuned!
Tuesday, July 7, 2009
Friday Fancies (a couple of days late)
Some beautiful ideas for playrooms today-


1.annon 2.pinkpicketfence 3.apartment therapy
4. judochopbella 5.annon 6.annon
7.judochopbella 8.annon 9.pinkpicketfence
Thursday, July 2, 2009
New prints- all framed up!
These beautiful hand made artworks are all framed up now and ready for Sunday! These photos do not do them justice- they are simply superb.
They are all made from patterned textured paper which is then machine stitched onto a background card. Reused buttons are used for the eyes, which are sewn on by hand. Each of the pieces are made individually and no two are ever the same.
They are finished off in a beautiful simple white frame (23 x 20cm) ready to stand up or hang on your wall.
All of the prints, except for the set of Owls which are larger at 21 x 26cm (when framed are 26 x 31cm), measure 10.5 x 15cm, and when in the frame measure 28 x 25cm.
We have in stock:
- set of 2 owls

- red and blue whale

- set of 2 pink whales

- blue rabbit

- red bird

- pink bird

- various beautiful papers

Rebecca ox
Subscribe to:
Posts (Atom)